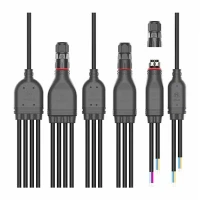
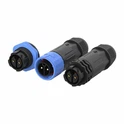
A20 waterproof connectors are essential components in a wide range of applications, especially in environments where moisture, dust, or other contaminants pose a threat to electrical connections. Ensuring the proper connection of these connectors is crucial for maintaining the safety, reliability, and performance of electrical systems. As a supplier of A20 waterproof connectors, I've seen firsthand how proper installation can transform the efficiency of electrical setups. In this blog, I'll share professional insights on how to ensure proper connections for A20 waterproof connectors.


Choosing the Right A20 Waterproof Connector
The first step in ensuring a proper connection is selecting the right A20 waterproof connector for your specific application. Different models of A20 waterproof connectors are designed to meet various requirements in terms of the number of pins, current - carrying capacity, voltage ratings, and environmental protection levels.
For instance, if you need to connect a simple circuit with three wires, the A20 3pin Waterproof Connector would be a suitable choice. It offers a compact and efficient solution for low - complexity electrical connections. On the other hand, for more complex systems that require more signal or power lines, the A20 5pin Waterproof Connector or A20 7pin Waterproof Connector can provide the necessary additional pins. You must also consider the connector's IP (Ingress Protection) rating. A higher IP rating indicates better protection against dust and water. For applications in harsh outdoor environments, connectors with IP67 or higher ratings are recommended.
Pre - installation Inspection
Before making any connections, it's vital to conduct a thorough inspection of the A20 waterproof connector and the associated cables or wires. Check the connector for any visible signs of damage, such as cracks, scratches, or deformed pins. Damaged connectors can lead to poor electrical contact, increased resistance, and potential short - circuits.
Inspect the cable or wire ends as well. Ensure that the insulation is intact and not frayed. If the insulation is damaged, it can expose the conductive parts, increasing the risk of electrical leakage and water ingress. Measure the length of the cable to ensure it is sufficient for the intended application. A cable that is too short may put excessive strain on the connector, while a cable that is too long can create a mess and may be more prone to damage.
Cleaning and Preparation
Cleanliness is key to ensuring a proper connection with A20 waterproof connectors. Use a clean, dry cloth to remove any dirt, dust, or debris from the connector surfaces, both inside and outside. For stubborn contaminants, you can use a mild solvent such as isopropyl alcohol. However, make sure to dry the connectors thoroughly before proceeding with the installation.
As part of the preparation, it's important to strip the cable insulation properly. Use a suitable wire stripper to remove the insulation from the cable ends, exposing the appropriate length of conductor. The length of the exposed conductor should match the requirements of the connector. Too much exposed conductor can cause short - circuits, while too little can result in poor electrical contact.
Proper Insertion of Wires or Cables
When inserting the wires or cables into the A20 waterproof connector, it's crucial to follow the correct pin - out diagram. Each pin in the connector is designed for a specific wire or signal, and incorrect wiring can lead to malfunctioning of the electrical system.
Carefully align the wire with the appropriate pin and insert it into the connector. Make sure the wire is fully seated and that there is no loose contact. Some A20 waterproof connectors may require you to use a special tool to secure the wire in place, such as a crimping tool. When crimping, apply the right amount of force to ensure a strong and reliable connection. An under - crimped connection can result in high resistance and overheating, while an over - crimped connection can damage the wire or the connector.
Sealing and Waterproofing
One of the main features of A20 waterproof connectors is their ability to provide a waterproof seal. After inserting the wires, use the provided sealing gaskets or O - rings to create a tight seal. These sealing components are designed to prevent water and moisture from entering the connector and reaching the electrical contacts.
Make sure the gaskets are installed correctly and are not damaged. Check for any gaps or misalignments that could compromise the seal. Some connectors may require you to apply a specific type of sealant or adhesive to enhance the waterproofing properties. In such cases, follow the manufacturer's instructions carefully to ensure proper application.
Connection Verification
Once the connector is assembled and sealed, it's essential to verify the connection. Use a multimeter to check the electrical continuity between the pins and the corresponding wires. Measure the resistance to ensure it is within the acceptable range. If the resistance is too high, it may indicate a loose or faulty connection that needs to be addressed.
You can also test the connector's waterproof performance by subjecting it to a water immersion test (if applicable). This will help you ensure that the sealing is effective and that the connector can withstand the intended environmental conditions. However, make sure to dry the connector completely after the test to prevent corrosion.
Maintenance and Periodic Checks
Proper connection is not a one - time task. Regular maintenance and periodic checks are necessary to ensure the long - term performance of A20 waterproof connectors. Inspect the connectors at regular intervals for signs of wear, corrosion, or damage. Check the seals and gaskets for any signs of degradation.
If you notice any issues, replace the damaged parts immediately. Keep the connectors clean and dry, and avoid exposing them to extreme temperatures or harsh chemicals. In some cases, it may be necessary to re - apply the sealant or adhesive to maintain the waterproof integrity.
Conclusion
Ensuring the proper connection of A20 waterproof connectors is a multi - step process that requires careful attention to detail. From choosing the right connector to regular maintenance, each step plays a crucial role in the overall performance and reliability of the electrical system. By following the guidelines outlined in this blog, you can significantly reduce the risk of connection failures and ensure the long - term success of your applications.
If you are in the market for high - quality A20 waterproof connectors or have any questions regarding their installation and maintenance, feel free to reach out to us. Our team of experts is ready to provide you with the best solutions and support for your specific needs. Let's discuss your requirements and start a successful partnership today.
References
- Various industry standards for electrical connectors and waterproofing.
- Manufacturer's manuals for A20 waterproof connectors.